If you want to skip the theory and quickly move on, make sure you:
- Install Node.js
- Install Atom (or your fancy text editor of choice)
- Download the boilerplate code
- Open the code in Atom
- Test whether it works
And then we can start writing our first code!
Before we can start creating the good stuff, we're first gonna need the tools to do so. With the goal of quickly being able to build prototypes in mind, I thought it would be good to use a programming language aimed towards the web. More and more applications you will find are built using web-based tech these days. This even applies to many of the (desktop and mobile) apps you might use. Under the hood, these applications are basically running a browser, much like what you're using to read this, in which their custom code is running.
One of the advantages of this approach is that the same code will automatically work on many platforms: Windows, OS X, Linux, the same code might even be used for the mobile version! If you're familiar with the design tool Figma: that's one example of where this is done. The same goes for the editor I will recommend to you in one of the next paragraphs (spoiler): Atom. Even if the application you'll end up working on is not intended to use these technologies, this combination of tools was the fastest I could think of to build rapid prototypes with and it will help you to communicate ideas to your development team. It's also very easy to run, you don't need any special software so you can easily do user tests on the user's own device!
Setting up your environment
So, now that we've decided — or actually I've decided for you — that we'll be developing using web technologies, we need to figure out how to get ready to start building our first prototype. First of all, if you're reading this you probably already have a browser with which you can test your prototype. I personally use Chrome so I will use that to explain a couple of neat tricks, but any popular browser will fit the bill just fine.
Programming language
The programming language that we'll be using is called JavaScript. It's important to know that a lot of the basic concepts underlying the code, which I will try to highlight as we come across them, are present in any programming language. Therefore, most of what you will learn actually applies to all programming languages, even though things will be named and formatted differently. With practice, you'll be able to "translate" between programming languages with ease. This also means that, even if your final product will be built in an entirely different language, your JavaScript prototype will still give the development team a lot of hints on how to approach things.
Small bit of theory: JavaScript is what you would call an interpreted language. This means that in order to run a program written in JavaScript, an interpreter running on the machine of the user goes through the code — exactly as you wrote it — and executes the instructions as it goes along. You might have heard about the Python programming language, where you will always run your script (which is then interpreted) by typing in python [myscript].py. In our case, the interpreter is in fact included as a part of our browser, allowing anyone with a computer that has been on the internet since it came out to potentially run the prototype. An advantage of interpreted languages is that they work on many platforms, as long as there is an interpreter available for it. Because the code is read on-the-fly, changes you make are immediately picked up the moment the program (in this case, the webpage) is refreshed.
Other languages — you might have heard of C++ or Objective-C — are called compiled languages. Many traditional applications you will be familiar with (Microsoft Office, native apps on your phone) are written in these. The code is converted into a machine-readable format by the developer, which is then ran by the user. The user doesn't need an interpreter in this case, the operating system (Windows) takes care of it. You may have seen these .exe files in Windows — these are compiled files. An advantage of compiled files is that they generally run faster than interpreted languages, which makes them traditionally very interesting for computationally intensive tasks, and stuff that needs to be very responsive (e.g., games).
Now you might be wondering why I'm bothering you with this and if there's a point I'm trying to make. A major difference between interpreted and compiled languages, that may affect you in the long run, is that the code written in interpreted languages can easily be read by third parties. This means that you should be careful when including passwords or other sensitive information in your code, since anyone who can download your JavaScript file to run it can also scan it for this type of information. It also applies to your intellectual property, because any fancy algorithms you may have thought of are also there for the taking. There are ways to make it more difficult for people to read the code, but it remains a risk. Something to keep in mind, although for your quick-and-dirty prototyping endeauvors it won't be that relevant yet.
You will notice later on that we will use a lot of freely available code in the form of plug-ins or modules, to avoid having to reinvent the wheel for all types of functionalities. Some of this code will be written in CoffeeScript, which is a different language intended to clean up and extend what JavaScript has to offer. However, browsers don't interpret CoffeeScript itself so it needs to be converted into JavaScript first. Coding in CoffeeScript is similar to coding in JavaScript, however the latter is much more widely used in the field, so we will focus on JavaScript and simply take these CoffeeScript modules as they are.
Server
Now that the language is sorted, we're also going to need a server, in order to serve up our prototypes. You may have saved a website on your computer before and realized that, indeed, it will load perfectly without needing a server simply by opening the file in your browser. However, we're going to use some extra functionalities that make it easier and more clear for us to write code, with which the server will be able to help us out. For example, we're going to split our code over multiple files to be able to keep the different sections of our prototype apart. This is good practice as it makes it easier to find specific parts, and it's nice when working with a team — members can focus on separate parts of the project without having to search one big file. The server we will use is called Node.js, and it will take all the smaller files and combine them into a single, huge one. It can also convert these CoffeeScript modules we will end up using into JavaScript for us.
Installing Node.js
Installing Node.js is easy since those kind folks have provided us with an installer for your favorite operating system. Just go to https://nodejs.org/en/download/ and follow the instructions. See you when you get back!
Editor
Now that we know we're going to write JavaScript, we have the server to run it on and the browser to view it with, all that's left is to find a nice environment in which we can actually write the code. Technically, a simple text editor such as Notepad is all you need, but that would be making things unnecessarily hard on yourself. There are fancier text editors that allow you to easily manage multiple files at once, as well as highlight and structure the code for you in such a way that it becomes much easier to read.
Some examples of these tools include Notepad++, Sublime Text and Atom. In the rest of this tutorial I will be using Atom.
Framework
JavaScript has many frameworks or libraries, which are kind of like collections of code that others have written to make life easier on us. A well-known example you might have heard of is jQuery, "The Write Less, Do More, JavaScript Library." It's important to note here that frameworks only add new functionality, they don't prevent you from doing anyting that plain old JavaScript allows you to do. You can freely intertwine code that uses the framework's functionalities with other code that comes pre-loaded with your programming language. What the frameworks try to do is prevent you from keep having to write that low-level basic code that has been written and used a thousand times before, so it aligns perfectly with our time-saving mindset of rapid prototyping!
For this tutorial, we'll be using a framework that is designed specifically for prototyping, with the designer in mind, called FramerJS. It's also the core of an integrated prototyping solution, Framer. This integrated solution combines a design interface (similar to Sketch) with the text-editing capabilities that we're now using Atom for. However, that application is currently only available for OS X and it costs some money. I wanted something that works for all of us, which is why we are hacking away with text editors. The price we pay is that we don't have a fancy drag-and-drop functionality with which we can build our interfaces. Also, many modules I came across are developed with Framer, and not FramerJS in mind so they don't always work out of the box.
In other words, do keep an eye on the amazing people at Framer, they are working on a Windows version of their software as we speak so it might become a viable, easier to use and more visual alternative to what we're doing here. They're also currently rolling out a new version (Framer X) which I believe has moved onto using JavaScript rather than CoffeeScript as the leading language, and it integrates nicely with other JavaScript frameworks that are used by "real" developers, such as React, which makes re-use of code that much easier. Unfortunately, the documentation on the Framer website has also been updated for Framer X, which is in many ways different from the FramerJS we're using. However, it seems that for now the old documentation is preserved here.
The first shortcut — boilerplate
So we have picked our language of choice, combined with a framework that is designed to speed up our prototyping process, but we still don't want to start building from scratch. It makes sense to start with a very simple prototype that has the basic structure, sets up FramerJS for us and has a small example of how to start, on top of which we can start building. These things are called a boilerplate, and there is one that was made specifically to get you started with JavaScript and FramerJS: ECMA-Framer (the official specifications of JavaScript are called ECMAScript). A fellow prototyping enthousiast (I'm guessing) called Andrew Liebchen has set this up for us, and I added a couple of small things to it, for example to allow us to combine JavaScript and CoffeeScript code within one project, which enables us to use many more modules that other people have made.
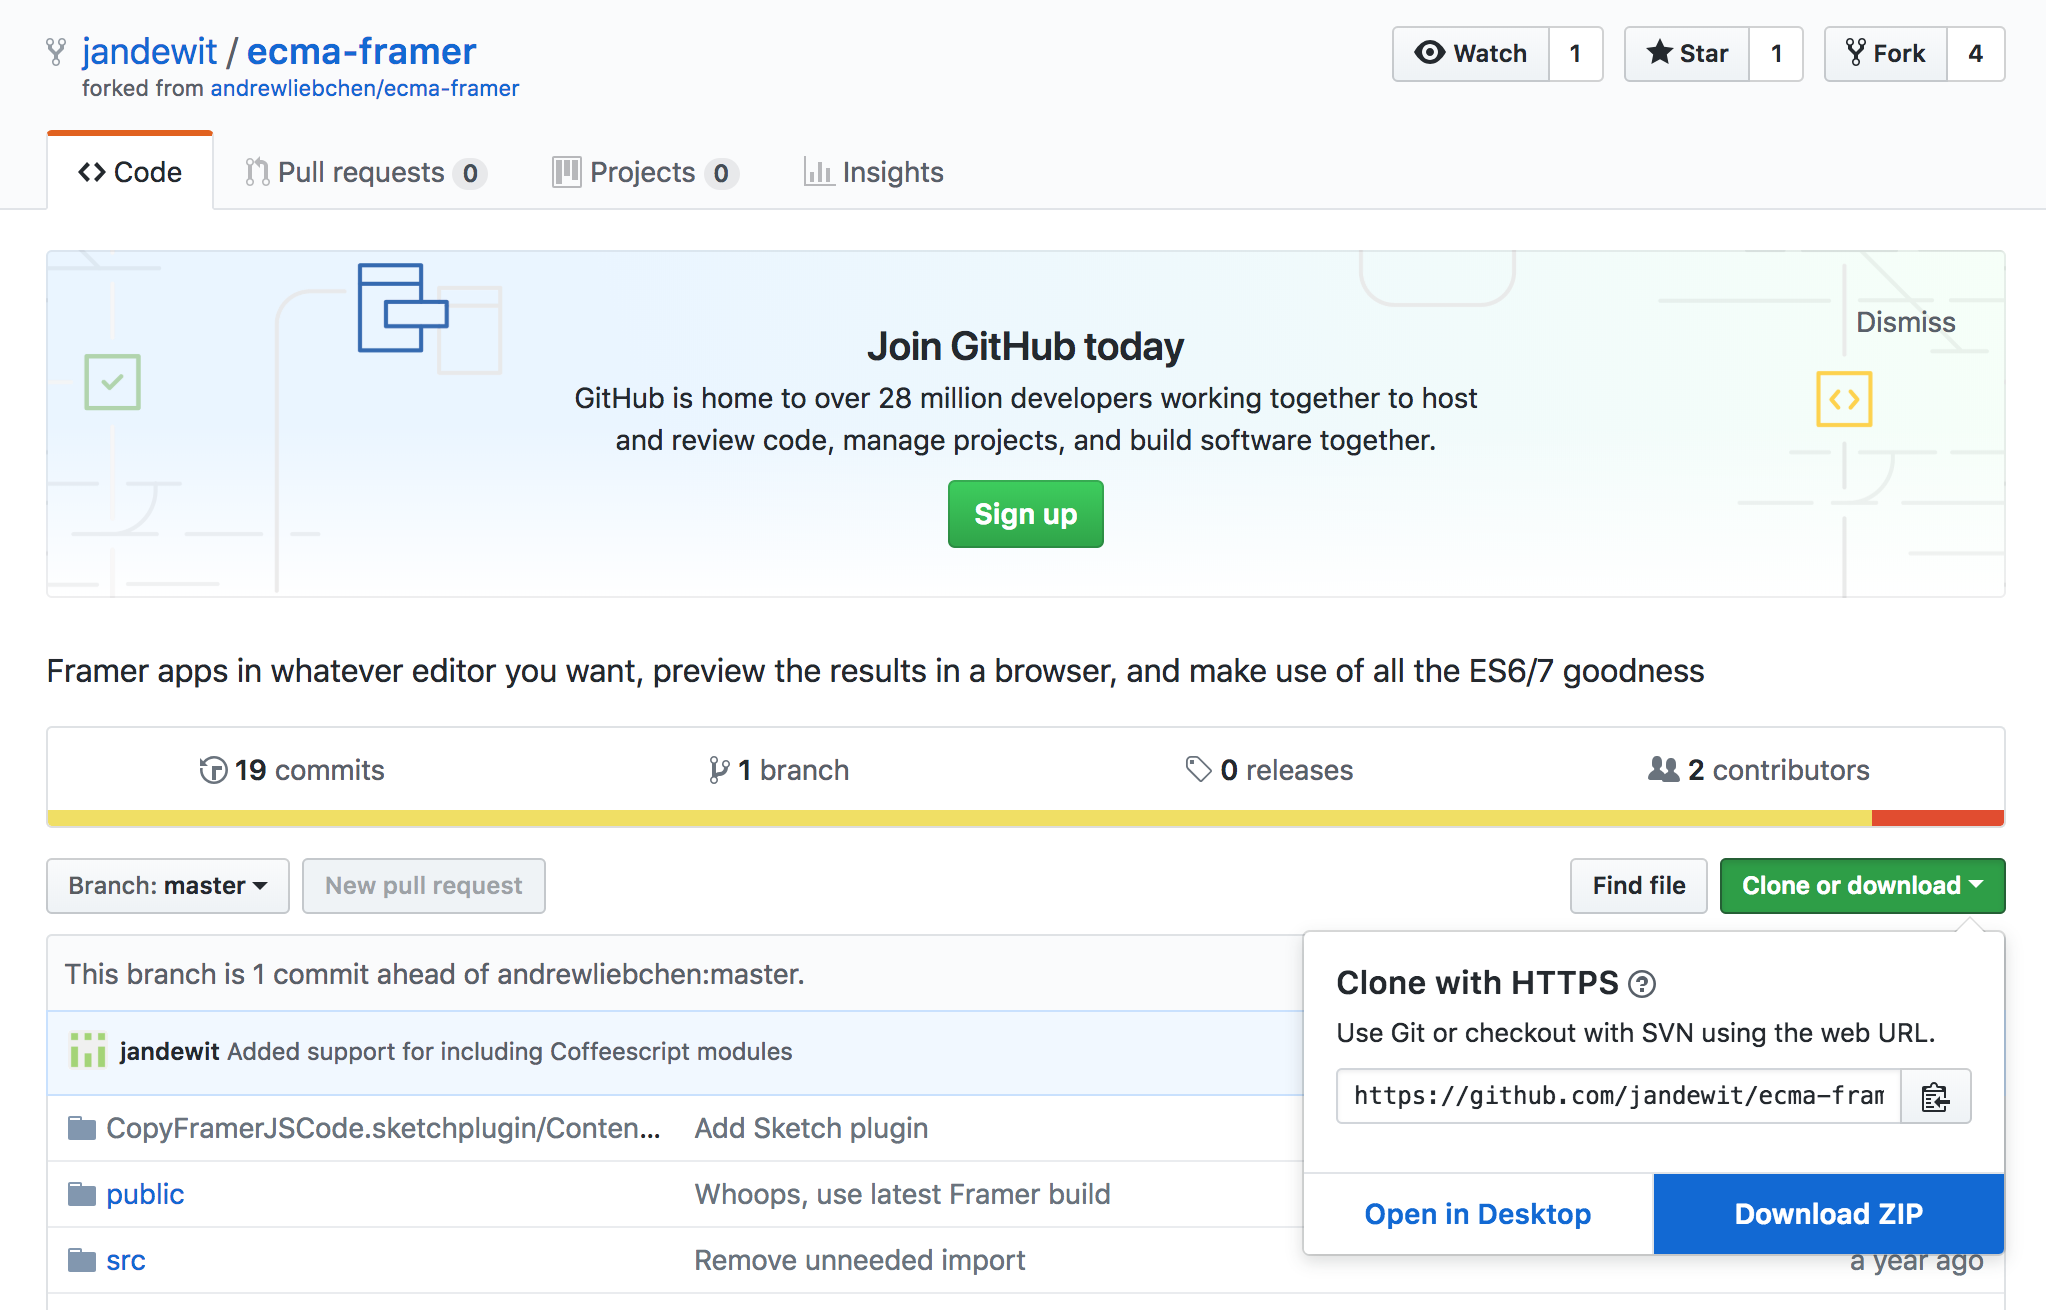
You can find the boilerplate code here. If you've used Git before, you can use your favorite client to clone the repository. If that previous sentence was complete jibberish to you, then just go to the website, click the Clone or download button and then click on Download ZIP.
 Put these files in a place where you can easily find them, since this will be the starting point of our prototype!
Opening the prototype in Atom
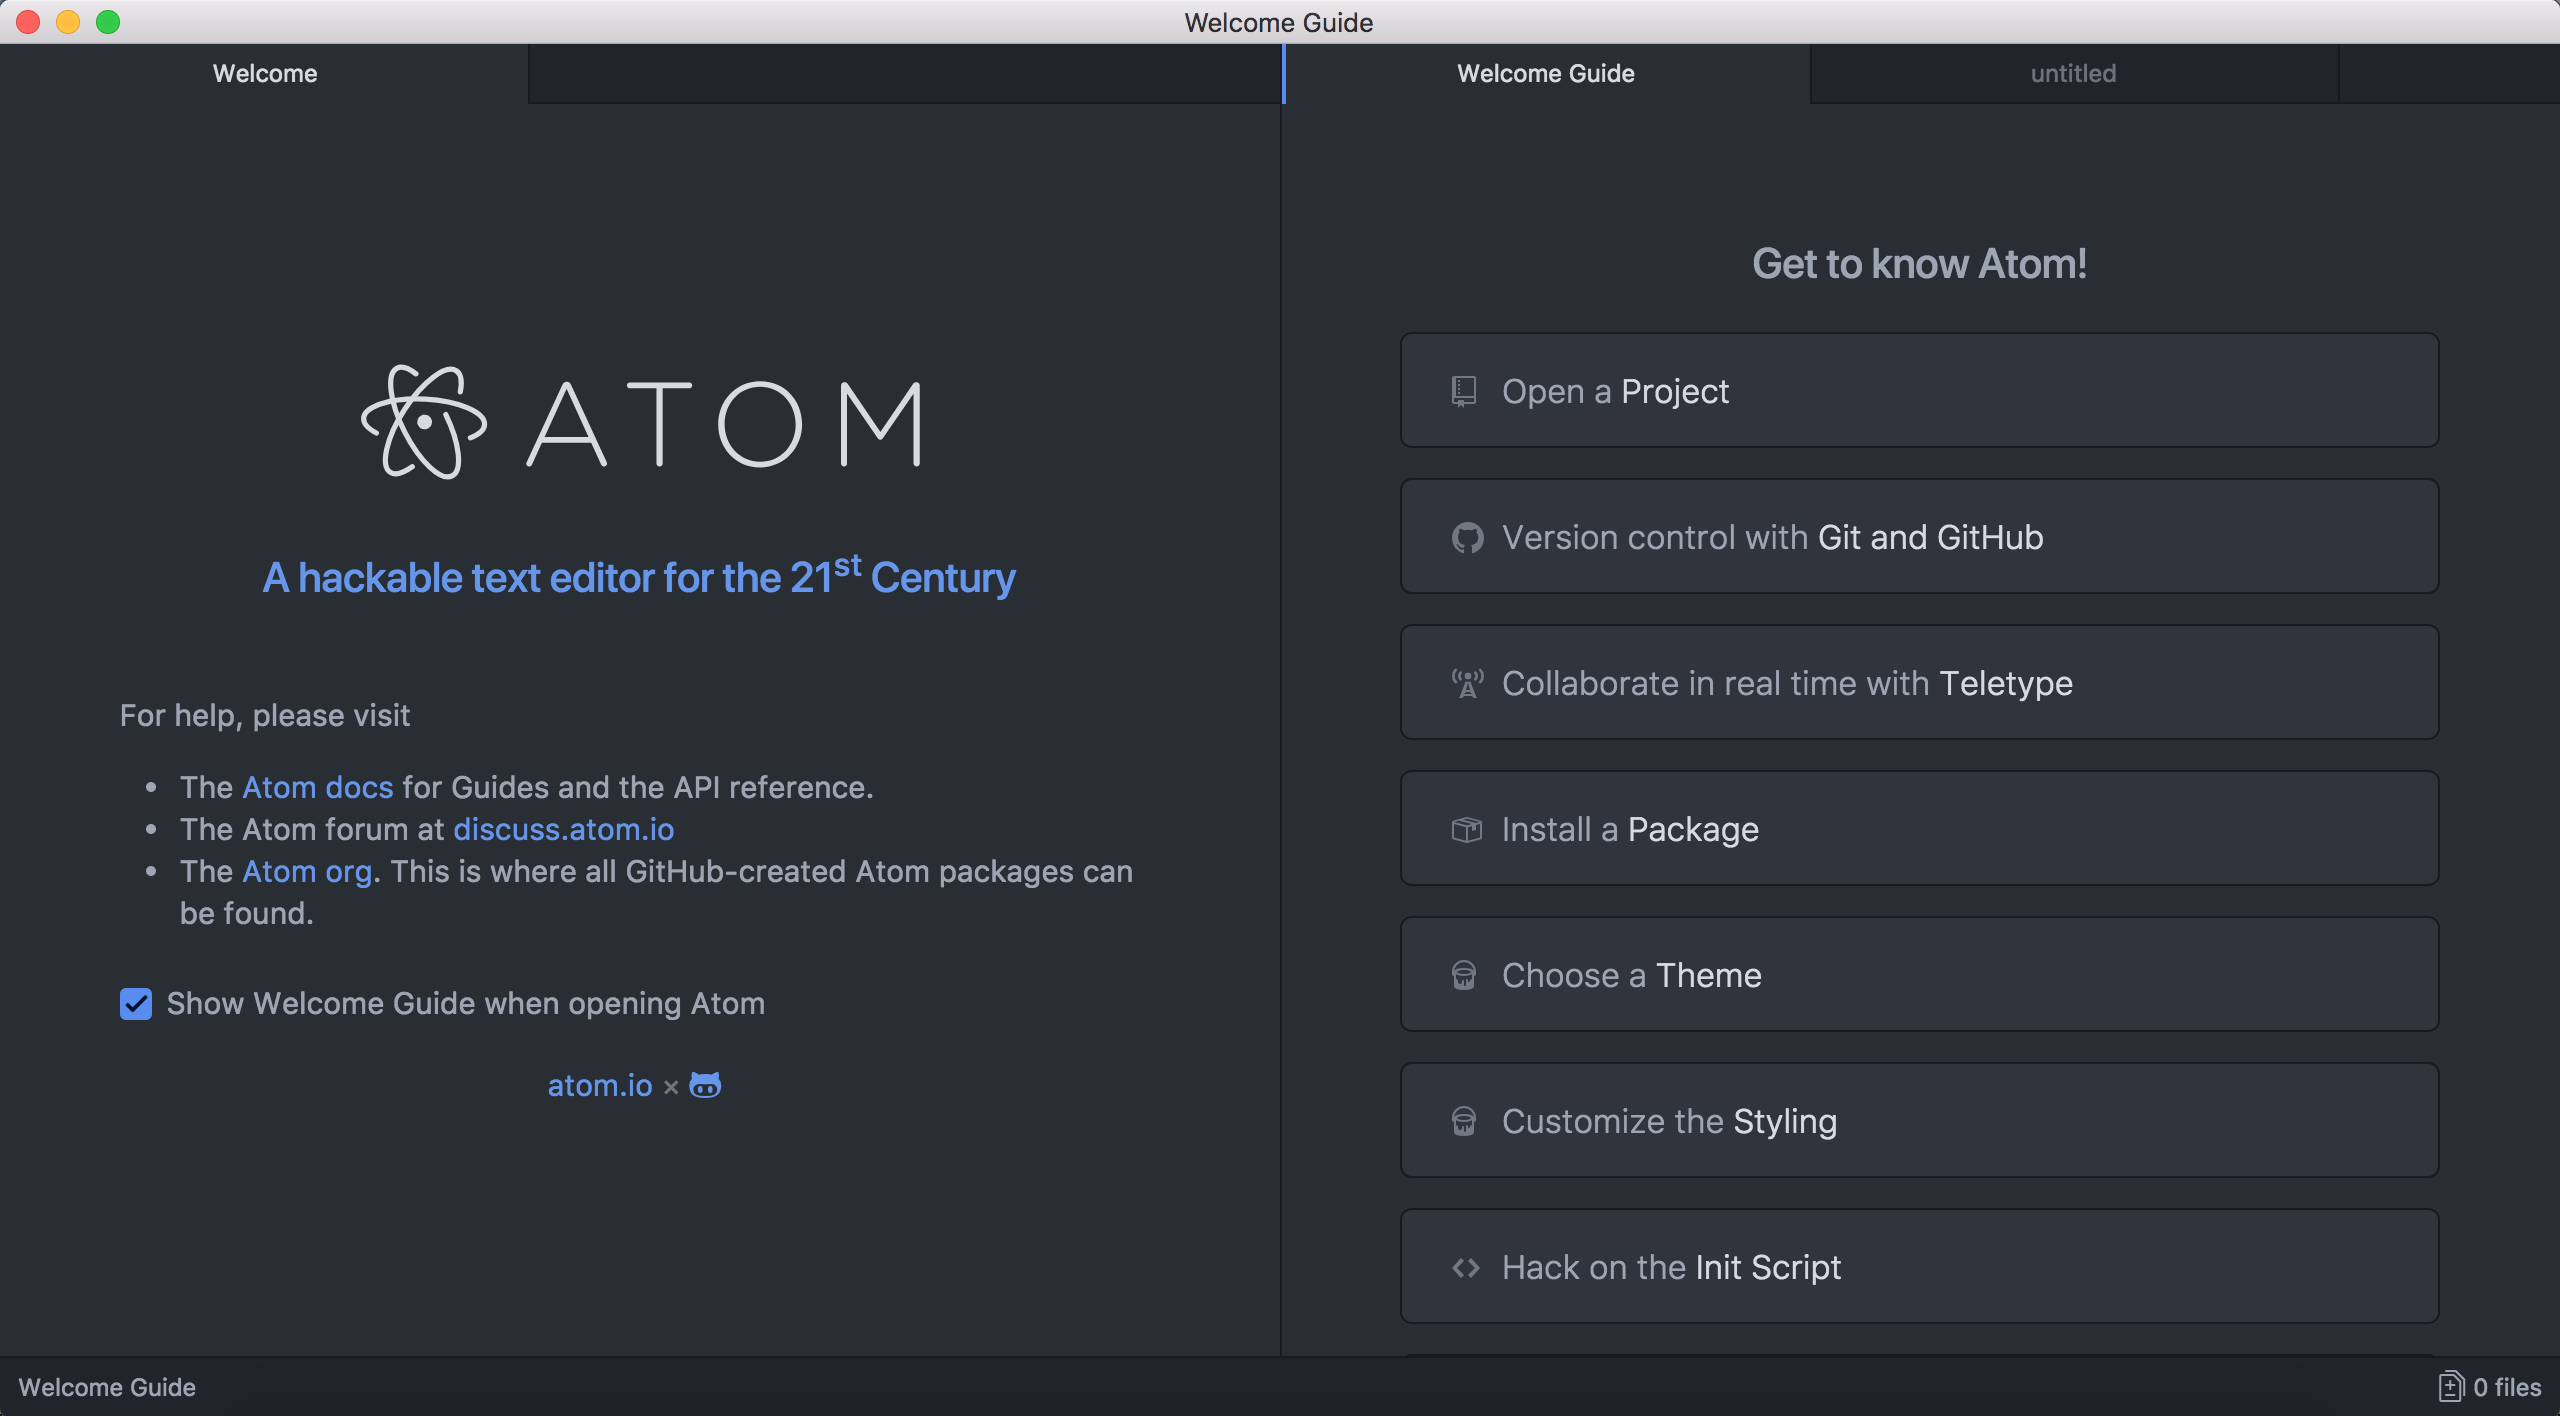
When you first open Atom, your screen will look something like this:
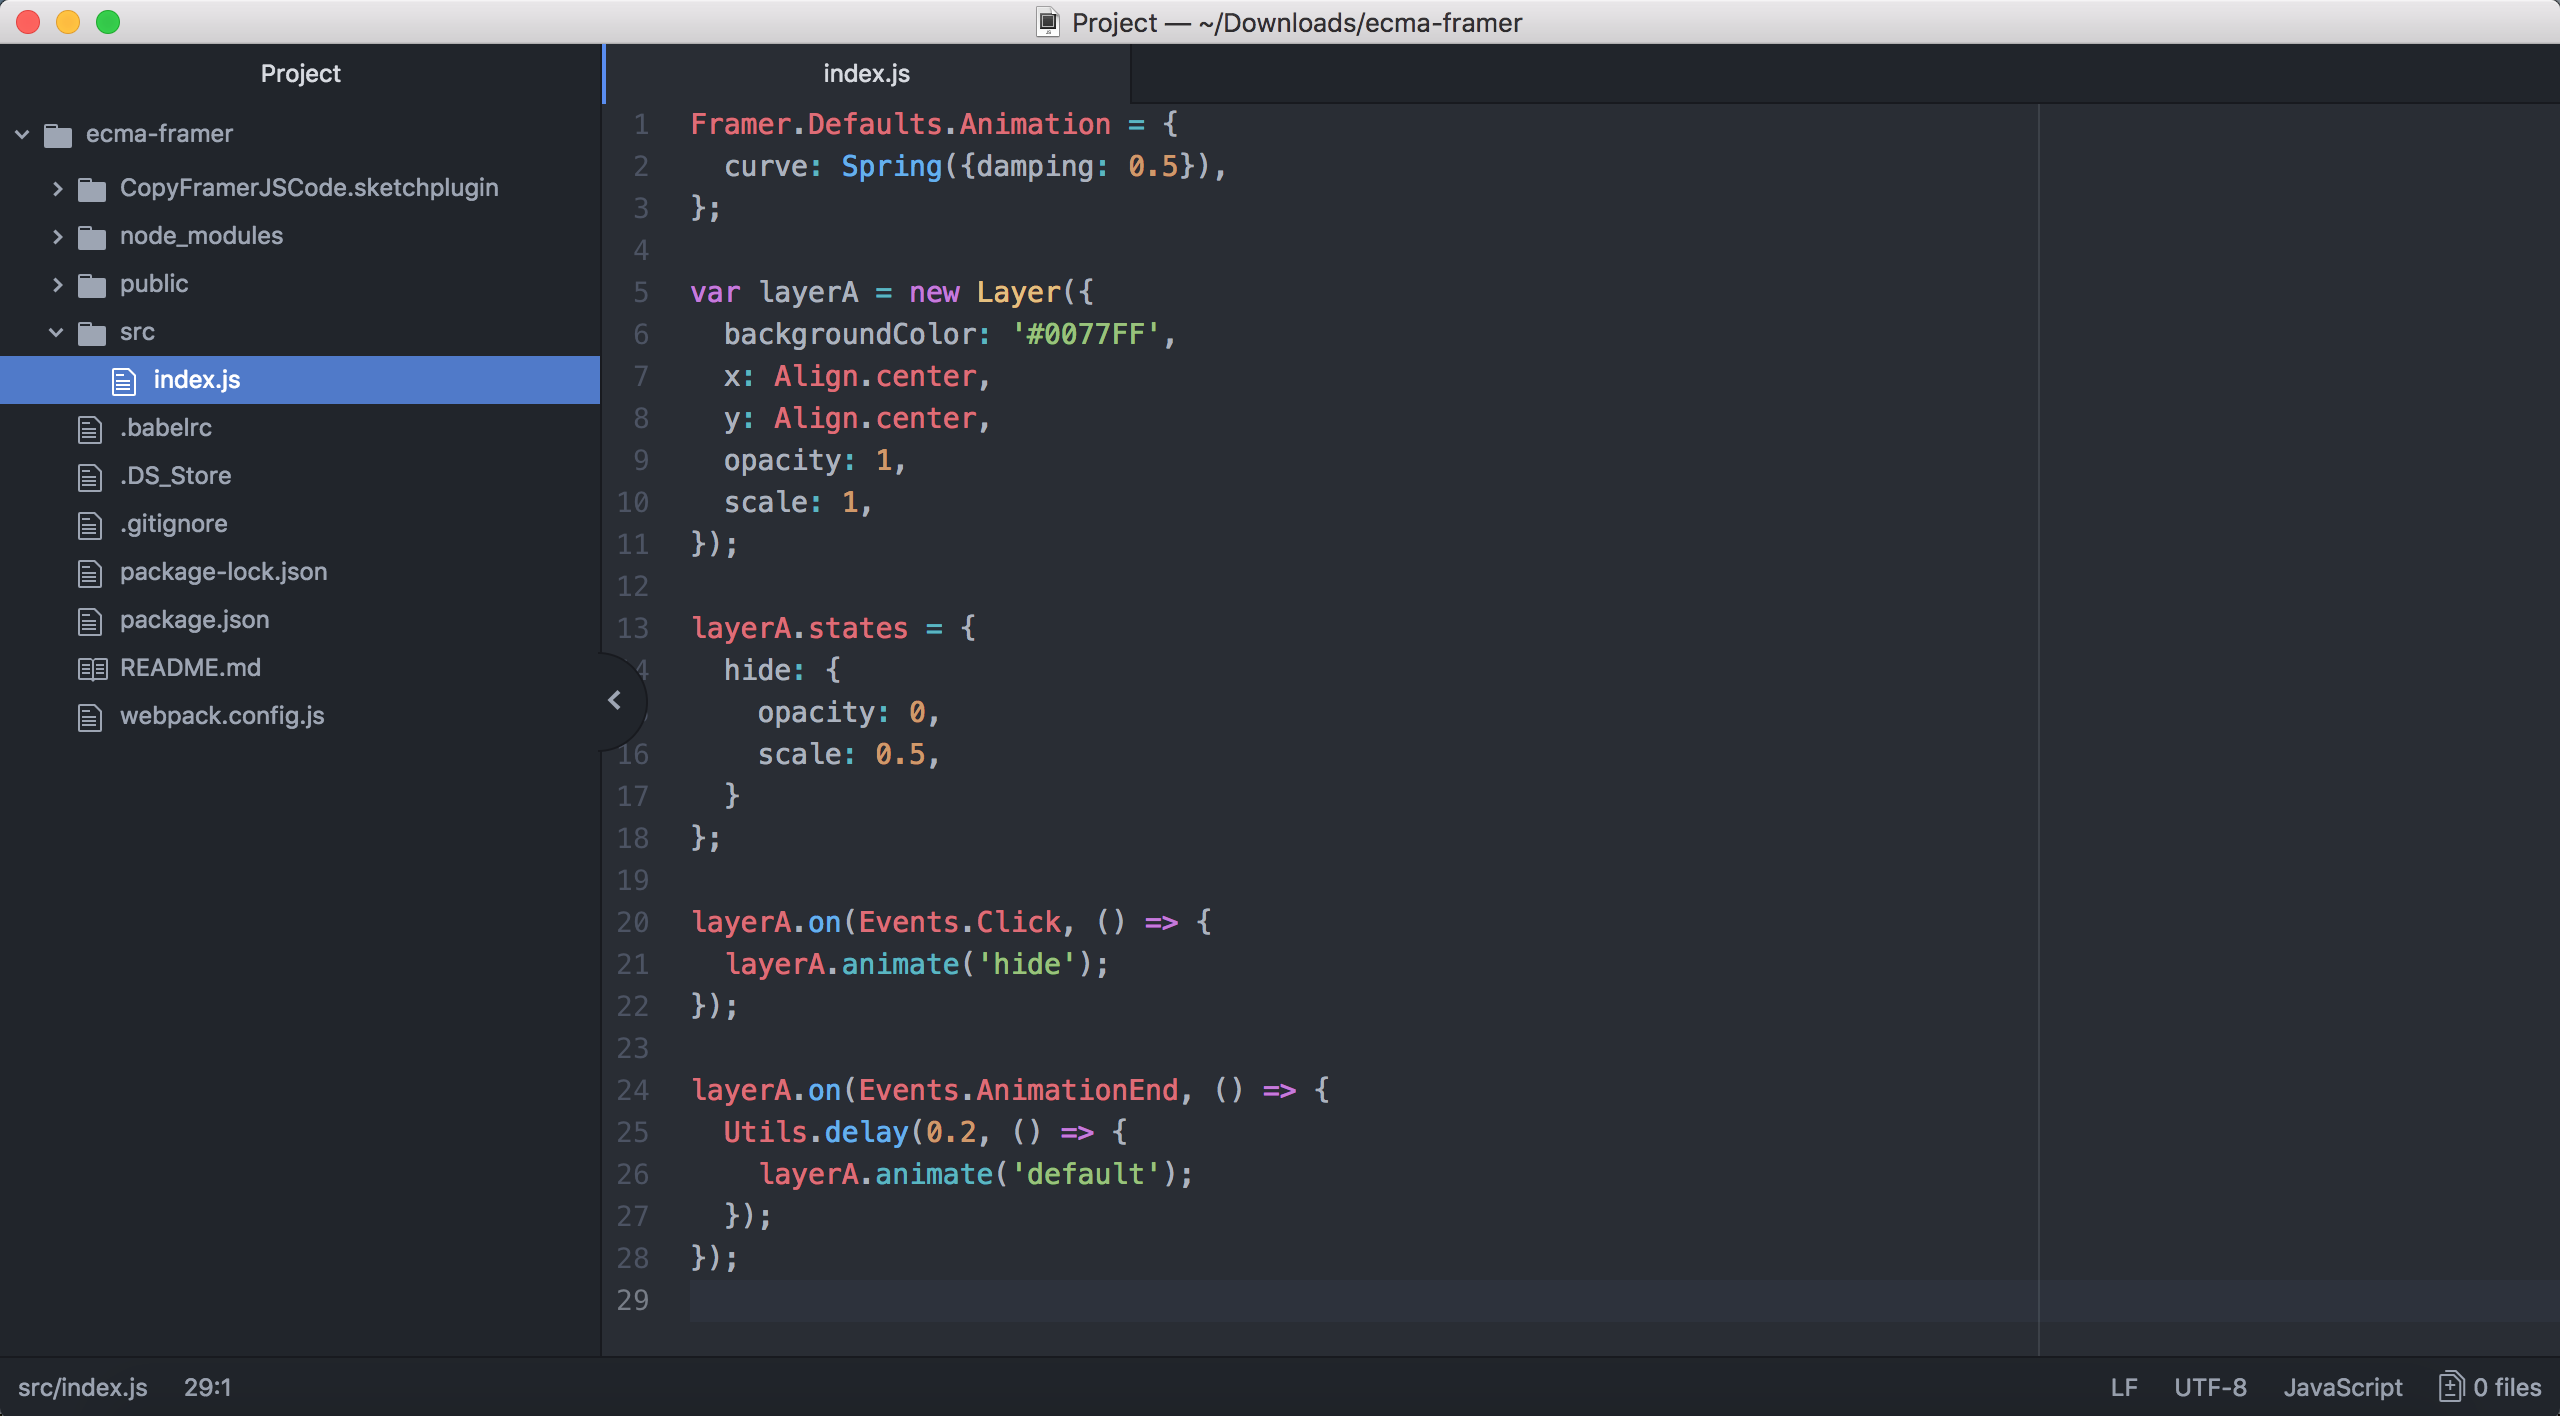
Click on Open a Project (or use the menu: File/Open...) and go to the boilerplate files you just downloaded. Select the main folder (e.g., ecma-framer-master) and press Open. An overview of all the files in your project will now appear on the left:

You can close the Welcome screen and the Welcome Guide by clicking on the "x" on their tab. In the list of project files, the main file with our JavaScript code is found in src/index.js. In general, this "src" folder (stands for source, as in source code) will contain the actual code of your prototype. Double-click on index.js to open this file and show its contents. You will see that different parts of the code are highlighted in different colors, with the goal to make things a bit easier to read. More on that later!
Running the prototype for the first time
In order to run the prototype, we need to start our Node.js server and let it know which code to run. The boilerplate code also relies on a bunch of plug-ins that still need to be downloaded and installed.
Start by opening a Terminal (OS X) or Command Prompt (Windows, opened with Windows key + R and then typing "cmd"). You will have to navigate using the command cd to the location of your prototype's files.
For example, if you placed the downloaded ECMA-Framer files in a folder on your desktop called ecma-framer-master, in Windows you would type into the Command Prompt:
cd C:\Users\[YOUR_USERNAME]\Desktop\ecma-framer-master
In OS X it would be something like:
cd ~/Desktop/ecma-framer-master
To automatically download and install the many plug-ins that the boilerplate needs in order to work, simply type (both in Windows and OS X):
npm install
It might take a while but you will only have to do this once. Then, starting Node.js is a simple matter of typing:
npm start
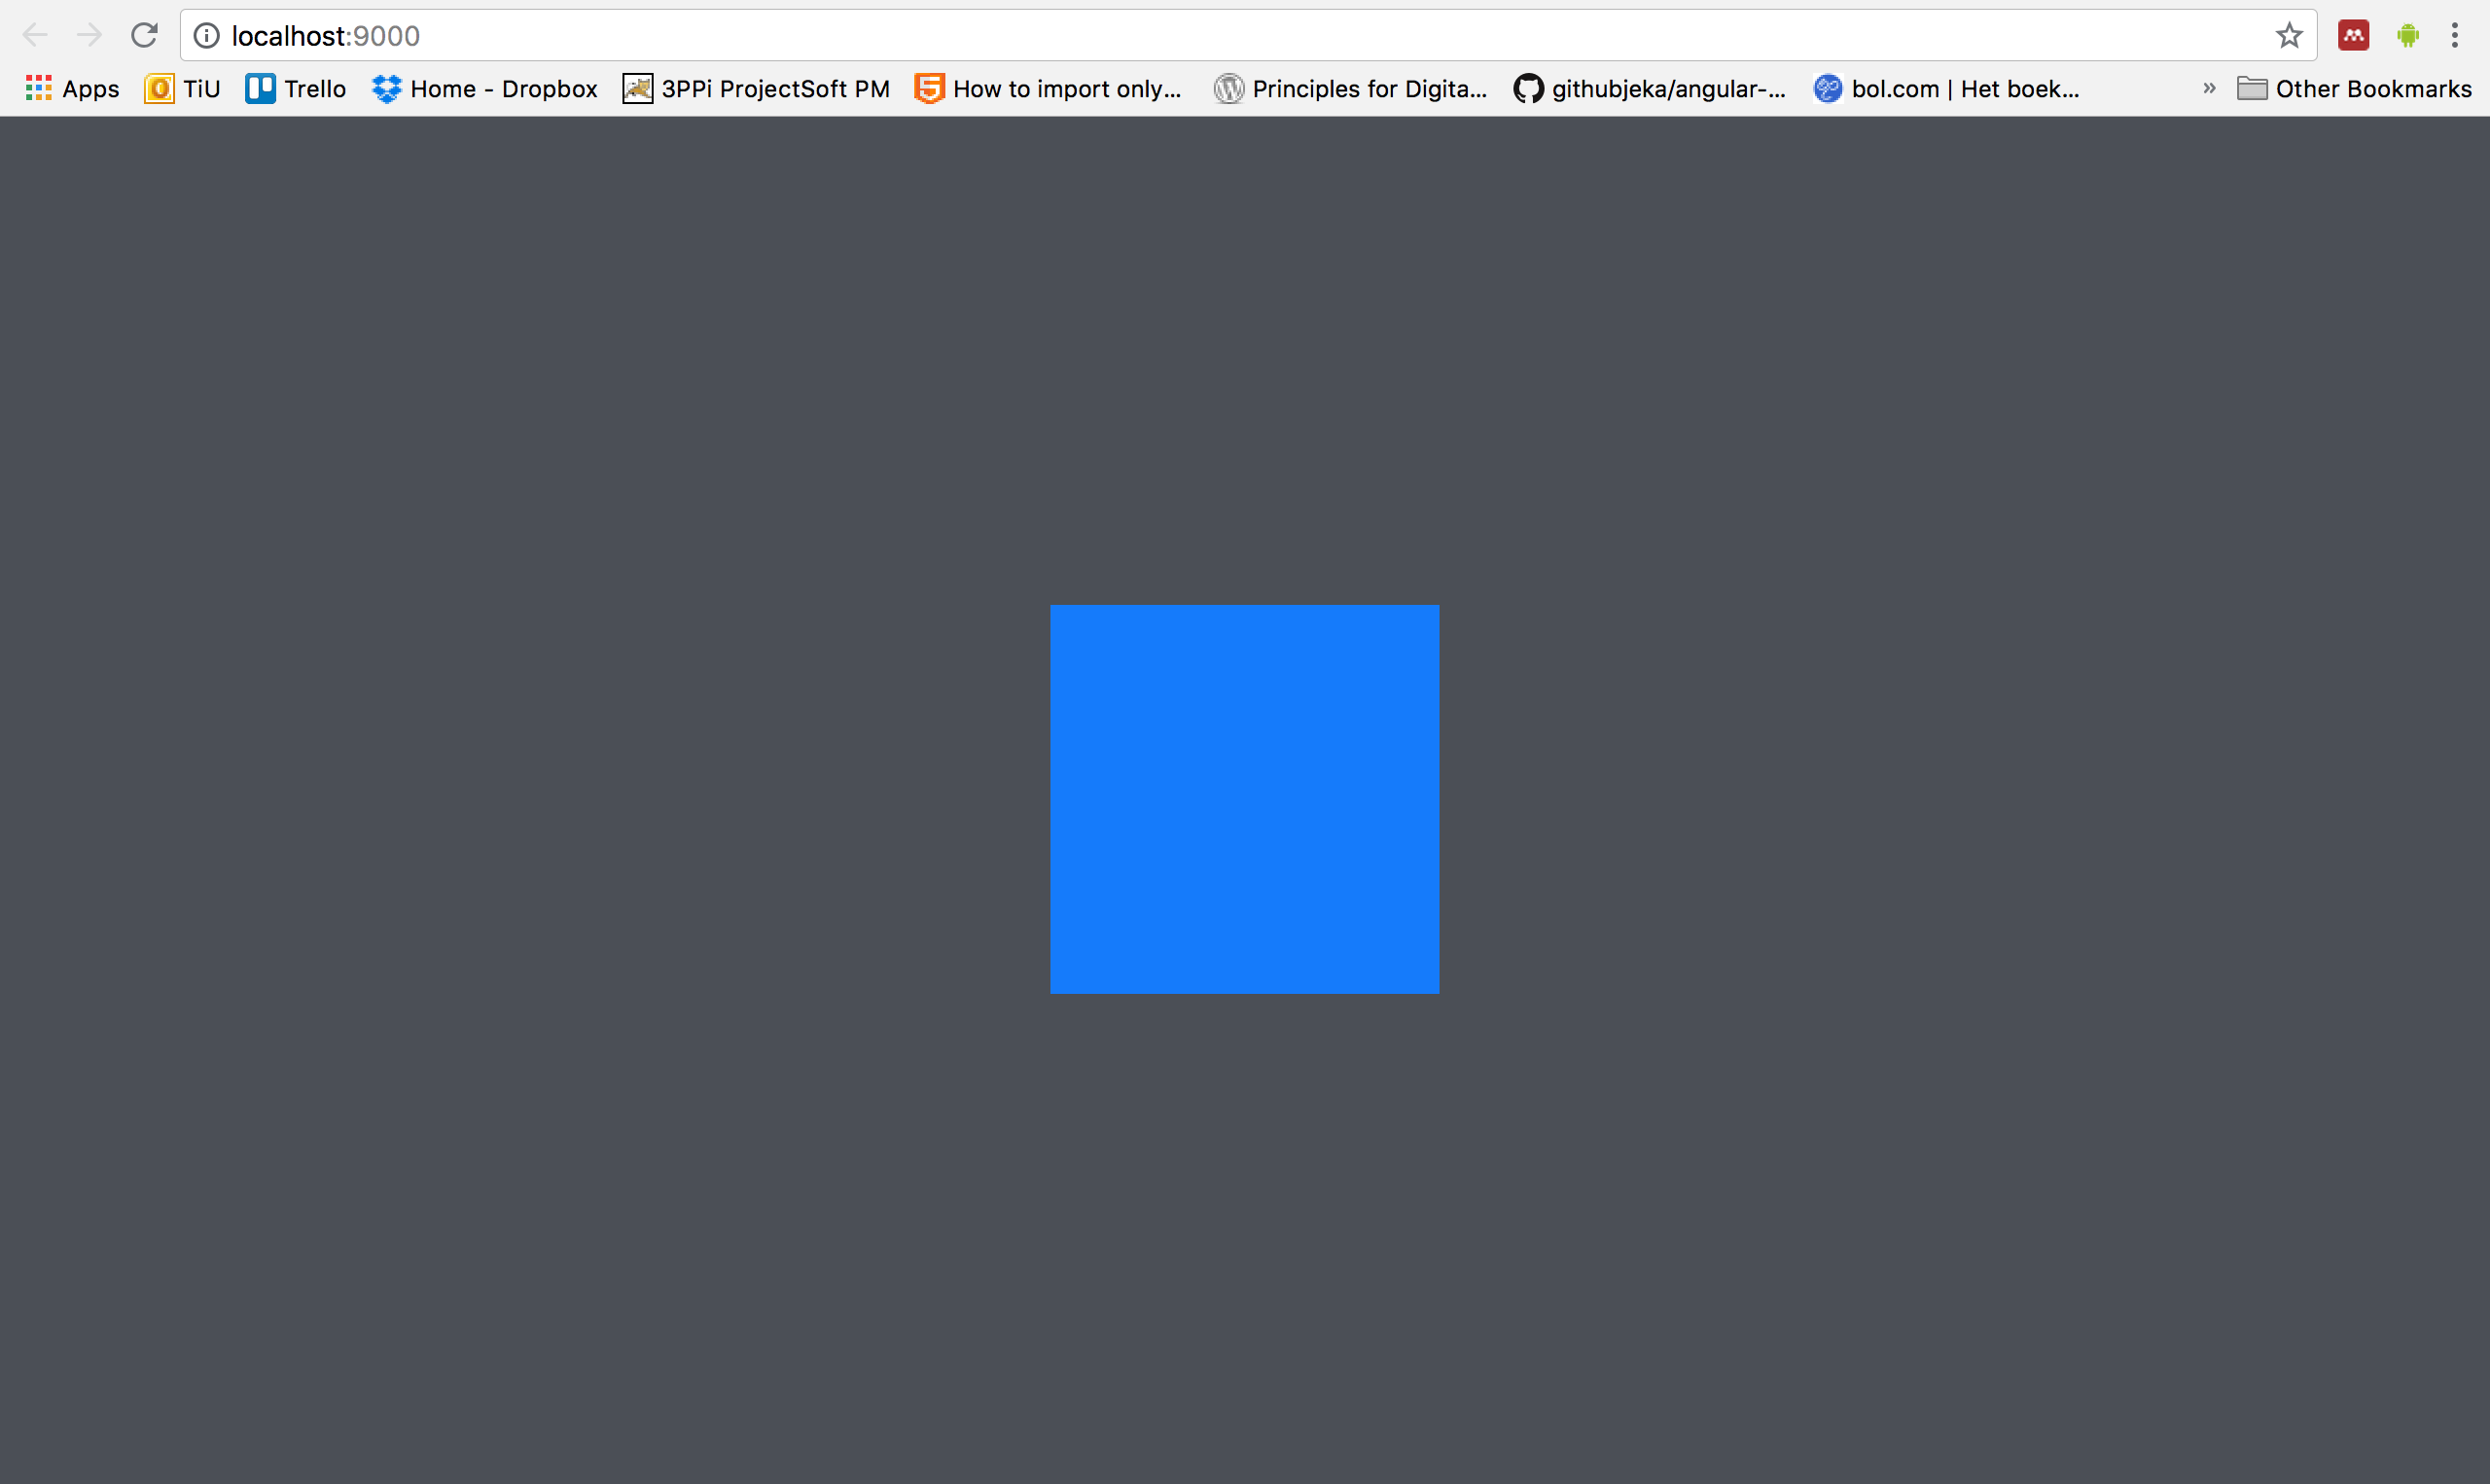
This should automatically open your browser and go to the address http://localhost:9000/, where your very first prototype should be visible. It still looks a bit boring but you can click on the blue square in the middle to get it to disappear and reappear again — your very first coded interaction!
You will see that this npm start program (the Node.js server) keeps running in your terminal window. It has to remain active for our prototype to function, so whenever you want to work on your prototype remember to start the Node.js server first, and not to close it until you're done with it.
Okay, if your website is up and running and you're able to click on the square, you're ready to start building. Let's start writing our first code!
(However, if you're stuck at the end of this part without a working prototype, drop a comment below!)